进入阿里巴巴矢量图标库
-
选择喜欢的图标的,点击添加到库
-
选择完之后,点击右上角的购物车图标(前提是已经登录,推荐使用GitHub登录)
-
然后在右侧中点击添加至项目
-
之后在个人主页中可以看见
1.Unicode
2.Font class
此次便是对于这两个的使用
Unicode
开始进入时,会自动生成代码,如果没有,则点击生成
例:
|
1
2
3
4
5
6
7
8
9
|
@font-face {
font-family: 'iconfont';
src: url('//at.alicdn.com/t/font_1743720_lf0mzduk11.eot');
src: url('//at.alicdn.com/t/font_1743720_lf0mzduk11.eot?#iefix') format('embedded-opentype'),
url('//at.alicdn.com/t/font_1743720_lf0mzduk11.woff2') format('woff2'),
url('//at.alicdn.com/t/font_1743720_lf0mzduk11.woff') format('woff'),
url('//at.alicdn.com/t/font_1743720_lf0mzduk11.ttf') format('truetype'),
url('//at.alicdn.com/t/font_1743720_lf0mzduk11.svg#iconfont') format('svg');
}
|
其中最最关键的是iconfont
同时,我们还需要修改其对应的url路径
以第一个举例
|
1
2
3
4
|
<!--原来的url-->
src: url('//at.alicdn.com/t/font_1743720_lf0mzduk11.eot');
<!--修改后的的url,打开浏览器之后访问一下对应的url,提示下载eot文件则修改成功-->
|
Unicode中对于图标的引用如下
在刚刚的个人页面中,选中Unicode可以看见加入的图标都在下面,以搜索举例
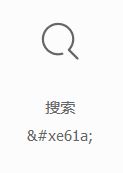
鼠标滑上去以后可以看见复制代码的图标,点击复制
以下为实例代码
|
1
2
3
4
5
6
7
8
9
10
11
12
13
14
15
16
17
18
19
20
21
22
23
24
25
26
27
28
29
30
31
32
33
34
35
36
37
38
39
40
41
|
<!DOCTYPE html>
<html lang="en">
<head>
<meta charset="UTF-8">
<meta name="viewport" content="width=device-width, initial-scale=1.0">
<title>图标使用</title>
<style>
@font-face {
font-family: 'iconfont';
src: url('#iefix') format('embedded-opentype'),
url('') format('truetype'),
}
.wrapper {
width: 1090px;
height: 300px;
background-color: antiquewhite;
margin: 0px auto;
text-align: center;
}
.iconTest::before {
content: "\e61a";
font-family: "iconfont";
}
</style>
</head>
<body>
<div class="container">
<div class="wrapper">
<span class="iconTest"> : Hello CSS</span>
</div>
</div>
</body>
</html>
|
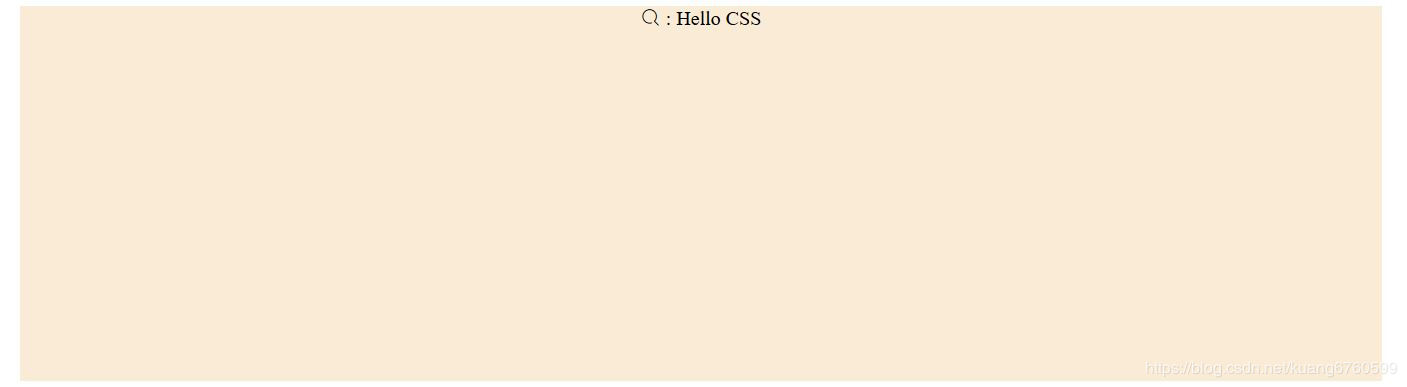
效果图
###Font Class中对于图标的引用
这个就要简便很多了
在图标库个人主页的Unicode旁边就是Fonte Class点击,再任选一个图标,复制代码。
|
1
2
3
4
5
6
7
8
9
10
11
12
13
14
15
16
17
18
19
20
21
22
23
24
25
26
27
28
|
<!DOCTYPE html>
<html lang="en">
<head>
<meta charset="UTF-8">
<meta name="viewport" content="width=device-width, initial-scale=1.0">
<title>图标使用</title>
<!--以引入css资源的方式使用,url同样修改一下,加入>
<link rel="stylesheet" href="">
<style>
.wrapper {
width: 1090px;
height: 300px;
background-color: antiquewhite;
margin: 0px auto;
text-align: center;
}
</style>
</head>
<body>
<div class="container">
<div class="wrapper">
<!--iconfont表示这个是一个图标样式-->
<!--icon-sousuot表示这个是图标中的搜索-->
<span class="iconfont icon-sousuo"></span><span> : Hello CSS</span>
</div>
</div>
</body>
</html>
|
更加简便的使用
有时候,一个复杂的网页包含各种图标的引用,例如导航栏每个栏目的前面都要一个图标,这个便用到了了::before,而同样后面有时候又要用span来引用图标,这时,我们便可以引入Font-Class中的使用方法却达到了两种场景的使用
|
1
2
3
4
5
6
7
8
9
10
11
12
13
14
15
16
17
18
19
20
21
22
23
24
25
26
27
28
29
30
|
<!DOCTYPE html>
<html lang="en">
<head>
<meta charset="UTF-8">
<meta name="viewport" content="width=device-width, initial-scale=1.0">
<title>图标使用</title>
<link rel="stylesheet" href="">
<style>
.wrapper {
width: 1090px;
height: 300px;
background-color: antiquewhite;
margin: 0px auto;
text-align: center;
}
.iconTest::after {
content: "\e61a";
font-family: "iconfont";
}
</style>
</head>
<body>
<div class="container">
<div class="wrapper">
<span class="iconfont icon-sousuo"></span><span class="iconTest"> : Hello CSS</span>
</div>
</div>
</body>
</html>
|
效果便是Hello CSS前后都有搜索图标
原因:打开引入的css我们可以发现其中也包含了Unicode,因此之后的使用只需要引入Font-Class即可,而图标对应的十六进制编码在Unicode中复制,也算是一个小技巧。
|


