本文实例讲述了jQuery实现鼠标放置名字上显示详细内容气泡提示框效果的方法。分享给大家供大家参考,具体如下:

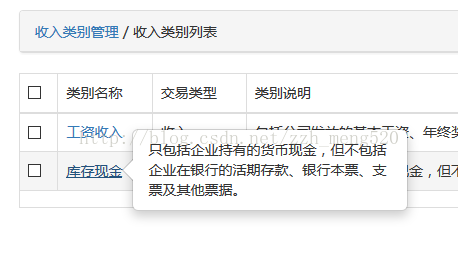
实现效果如上图,当鼠标放置到名字上时,则显示出内容详情。
实现具体过程如下:
1、需要加这句js
|
1
2
3
4
5
6
|
<!--实现鼠标放置名字上显示气泡说明的js--><script>$(function () { $('[data-toggle="popover"]').popover()});</script> |
2、html代码如下:
|
1
2
3
|
<td><a href="#" rel="external nofollow" rel="external nofollow" data-trigger="hover" title="此处可输入题目" data-container="body" data-toggle="popover" data-placement="right" data-content="此处是气泡显示内容的变量">变量名称</a></td> |
这样就可以实现气泡效果了,还是挺有意思的一个小效果。
PS:经过脚本之家测试,此处缺少了bootstrap相关组件,这里给出了一个demo示例供大家参考:
|
1
2
3
4
5
6
7
8
9
10
11
12
13
14
15
16
17
18
19
20
21
|
<!DOCTYPE html PUBLIC "-//W3C//DTD XHTML 1.0 Transitional//EN" "http://www.w3.org/TR/xhtml1/DTD/xhtml1-transitional.dtd"><html xmlns="http://www.w3.org/1999/xhtml"><head><meta http-equiv="Content-Type" content="text/html; charset=utf-8" /><title>www.jb51.net jQuery气泡提示框</title><script src="http://libs.baidu.com/jquery/2.0.0/jquery.min.js"></script><link href="https://cdn.bootcss.com/bootstrap-table/1.15.0/bootstrap-table.min.css" rel="external nofollow" rel=stylesheet/><script src="https://cdn.bootcss.com/popper.js/1.15.0/umd/popper.js"></script><script src="https://cdn.bootcss.com/twitter-bootstrap/4.4.1/js/bootstrap.min.js"></script></head><body><td><a href="#" rel="external nofollow" rel="external nofollow" data-trigger="hover" title="此处可输入题目" data-container="body" data-toggle="popover" data-placement="right" data-content="此处是气泡显示内容的变量">变量名称</a></td><script>$(function () { $('[data-toggle="popover"]').popover()});</script></body></html> |
原文链接:https://blog.csdn.net/zzh_meng520/article/details/62889762
相关文章


