
Android ExpandableListView用法介绍

在 Android 开发中,列表展示是一种非常常见的交互形式。而 ExpandableListView 作为一种特殊的列表控件,它允许我们创建具有分组功能的列表,每个分组下还可以包含多个子项,并且分组可以展开
1. ExpandableListView 基本概念ExpandableListView 继承自 ListView,是 Android 提供的一种可展开的列表视图。它主要由分组(Group)和子项(Child)两部分组成。每个分组可以包含多个子项,用户可以通过点击分组来展开或收缩其对应的子项列表。这种控件适用于需要对数据进行分类展示的场景,例如联系人列表按照字母分组、商品列表按照类别分组等。 2. 布局文件中添加 ExpandableListView首先,我们需要在布局文件中添加 ExpandableListView 控件。以下是一个简单的示例:
在这个布局中,我们创建了一个垂直的线性布局,并在其中添加了一个 ExpandableListView,其宽度和高度都设置为 match_parent,以填充整个父布局。 3. 创建数据模型为了展示分组和子项的数据,我们需要创建相应的数据模型类。假设我们要展示一个水果分类列表,每个分类下有不同的水果,我们可以创建如下的数据模型类:
GroupModel 类用于表示分组信息,包含一个分组名称;ChildModel 类用于表示子项信息,包含一个子项名称。 4. 创建适配器ExpandableListView 需要使用适配器来将数据绑定到视图上。我们可以继承 BaseExpandableListAdapter 类来创建自定义适配器。以下是一个示例:
在这个适配器中,我们需要实现一系列的方法:
5. 在 Activity 中使用 ExpandableListView在 Activity 中,我们需要初始化数据、创建适配器并将其设置给 ExpandableListView。以下是示例代码:
在 onCreate 方法中,我们首先获取 ExpandableListView 控件的引用,然后调用 initData 方法初始化数据,接着创建适配器并将其设置给 ExpandableListView。 6. 处理分组和子项的点击事件我们可以为 ExpandableListView 添加分组和子项的点击事件监听器,以实现相应的交互逻辑。以下是示例代码:
在分组点击事件监听器中,我们可以获取点击的分组对象并进行相应的处理;在子项点击事件监听器中,我们可以获取点击的子项对象并进行相应的处理。 7. 高级应用:自定义视图除了使用系统提供的简单布局,我们还可以自定义分组和子项的视图,以实现更丰富的界面效果。以下是一个自定义视图的示例:
自定义子项布局文件 child_item.xml
修改适配器中的 getGroupView 和 getChildView 方法
通过自定义视图,我们可以在分组和子项中添加更多的控件,如图片、按钮等,从而实现更复杂的界面效果。 8. 总结ExpandableListView 是 Android 中一个非常实用的列表控件,它可以帮助我们实现具有分组功能的列表展示。通过本文的介绍,你应该已经掌握了 ExpandableListView 的基本用法,包括布局文件的添加、数据模型的创建、适配器的实现、点击事件的处理以及自定义视图的应用。在实际开发中,你可以根据具体需求对其进行进一步的扩展和优化,以满足不同的业务场景。希望本文对你有所帮助,祝你在 Android 开发中取得更好的成果! |
您可能感兴趣的文章 :

-
在Android平台上实现消息推送功能
随着移动互联网应用的飞速发展,消息推送已成为移动应用中不可或缺的功能。无论是电商、社交、新闻还是服务类应用,消息推送都能够 -
Android ExpandableListView用法介绍
在 Android 开发中,列表展示是一种非常常见的交互形式。而 ExpandableListView 作为一种特殊的列表控件,它允许我们创建具有分组功能的列表, -
Android Service功能使用介绍
在Android开发中,Service是一个在后台长时间运行的组件,不会提供用户界面。它可以用来处理一些需要在后台进行的操作,比如播放音乐、下 -
Android封装常用工具类的介绍
日志封装类-MyLog 是对androidlog的封装,封装后 可以设置显示级别 1 2 3 4 5 6 7 8 9 10 11 12 13 14 15 16 17 18 19 20 21 22 23 24 25 26 27 28 29 30 31 32 33 34 35 -
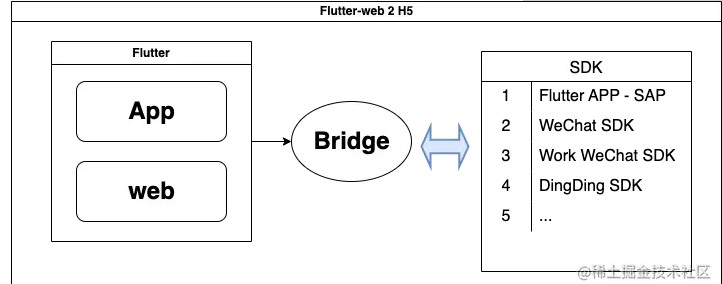
Flutter web bridge通信总结分析介绍
公司医疗业务人手比较少【小而美】的团队~ 较少采用的前端技术架构是: toC:小程序 toB2C: Flutter + H5(SPA - React)【build ???????? Android + IOS】 -

Android Flutter自定义动画路由的介绍
flutter中有默认的Route组件,叫做MaterialPageRoute,一般情况下我们在flutter中进行跳转的话,只需要向Navigator中传入一个MaterialPageRoute就可以了。 -
Android studio六大基本布局介绍
Android中常用的布局方式有以下几种: 线性布局LinearLayout 相对布局RelativeLayout 表格布局TableLayout 层布局FrameLayout 绝对布局AbsoluteLayout 网格布 -
Android Service启动绑定流程介绍
本文基于Android 11,参考《Android进阶解密》一书资料。了解Service的启动和绑定流程,以及Service的Context创建过程。 由于基于分析流程,忽略


-
Android通过单点触摸移动图片
2022-04-23
-
Android实现一个简单的单词本
2022-01-26
-
Android Studio实现帧动画的教程
2021-11-15
-
Android View实现圆形进度条的代码
2021-08-02
-
详解使用AccessibilityService实现自动遍历
2019-12-15

