写在前面
过年有大把的时光,为何一直宅在家里不出家门看着电脑,这究竟是道德的沦丧还是人性的泯灭...这一切都还得从一只蝙蝠说起...
咳咳,好了不皮了,言归正传。微信推出的小程序可谓是轻量又强大,所以最近我也开始了小程序的学习,学了挺多也看了很多文档,但总觉得自己没学到什么,感觉很迷茫。正所谓实践出真知,所以我选择了从高仿别人的小程序开始,选来选去最后选择了京东优选这个小程序(绝对不是因为它的界面清爽!)。
开发工具
效果速览
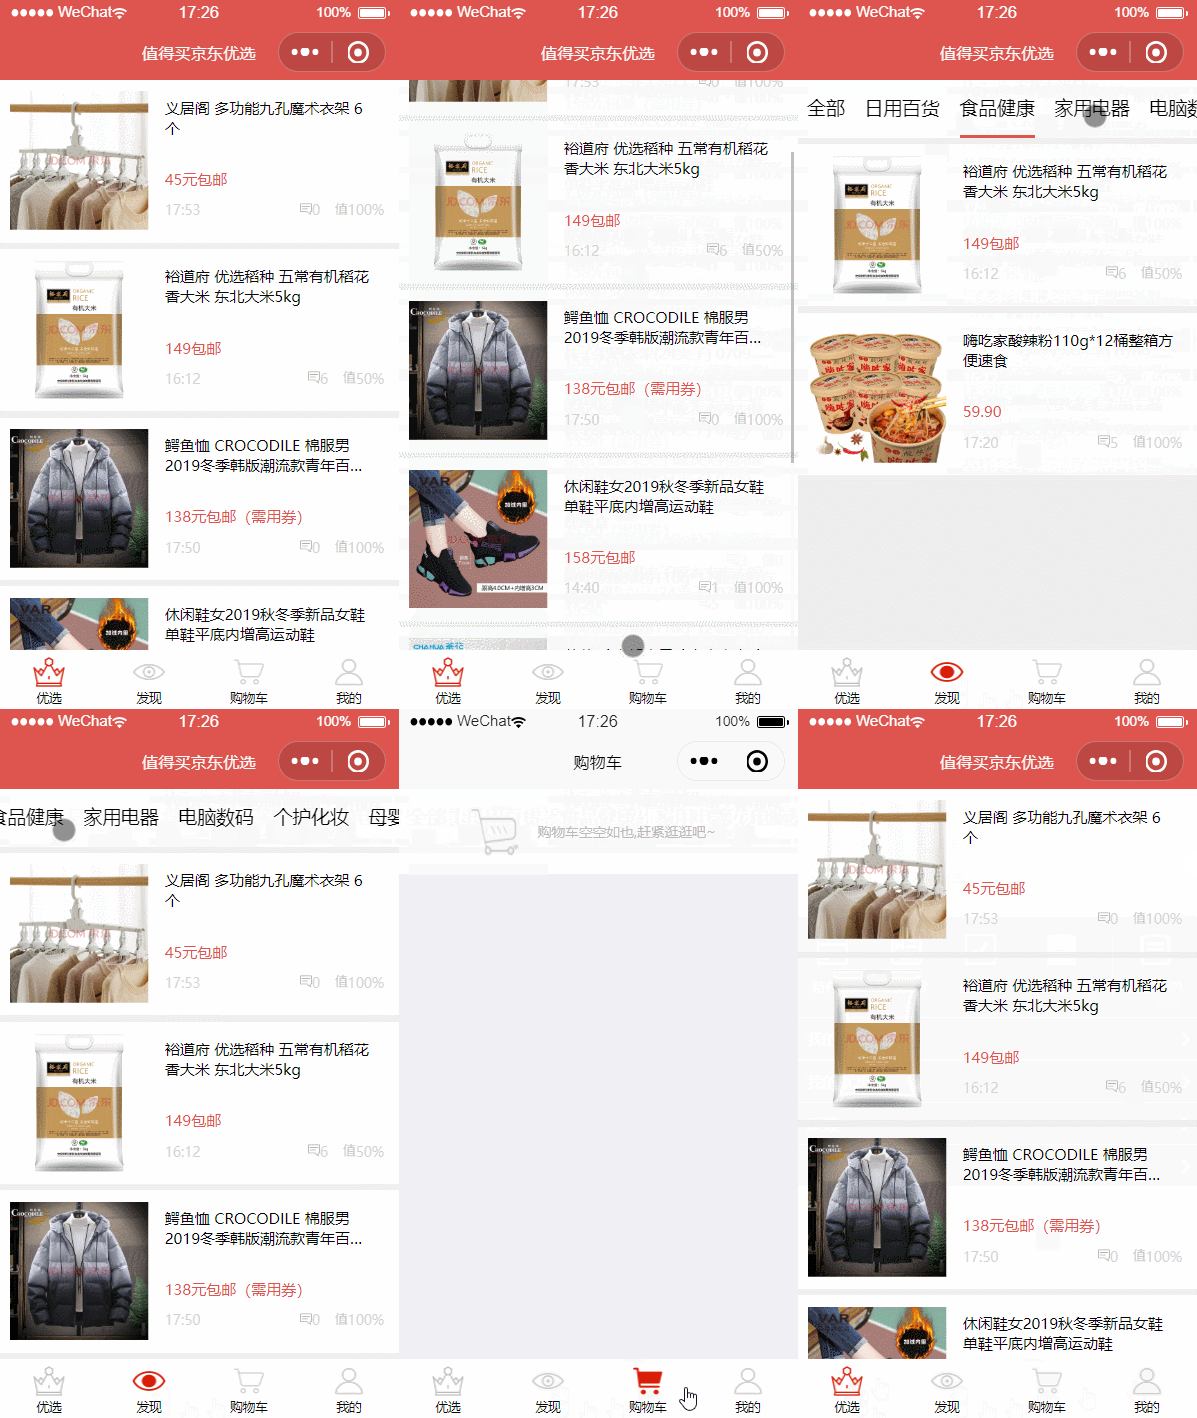
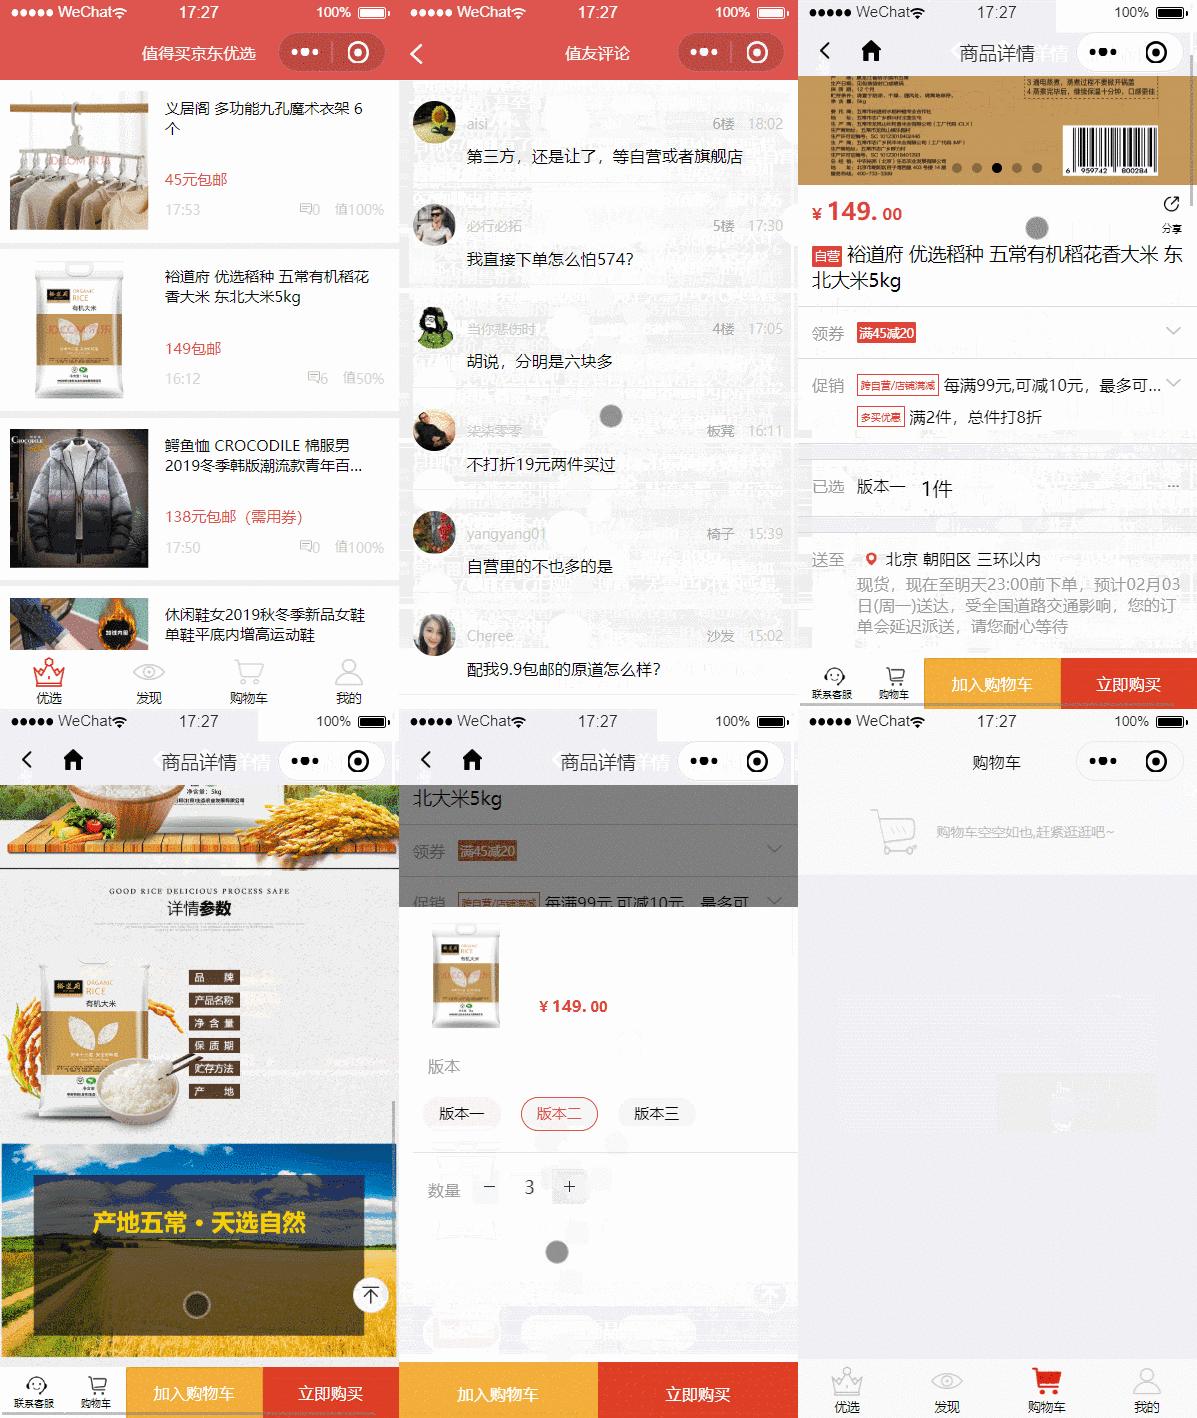
废话不多说,咱先来搞一波图片看看,
项目结构
这个项目我使用的是普通的开发,把所有的数据都放在了json-server中模拟。
可能很多人会觉得很奇怪,但这是因为我发现easy mock的网站经常打不开请求失败非常的不方便,所以我暂时没有选择mock数据,后期有时间我会把数据挪到easy mock上。
|
1
2
3
4
5
6
7
8
9
10
11
12
13
14
15
16
17
18
19
20
21
22
23
24
25
26
27
28
29
30
31
32
33
34
35
36
37
38
39
40
41
42
43
|
|-jd_recommend 项目名
|-api 模拟数据接口
|-db.json 模拟的数据
|-assets 资源文件
|-icons 图标资源
|-images 图片资源
|-components 组件模块
|-navigationBar 自定义导航栏
|-toast 自定义toast
|-stepper 有赞vant步进器组件
|-... 其他小程序所需组件
|-pages 项目页面
|-about 关于页面
|-account 我的订单页面
|-afterMarket 售后类型页面
|-appointment 我的预约页面
|-buy 填写订单信息页面
|-commentDetail 评论详情页面
|-discount 优惠券页面
|-explore 发现页面
|-feedback 反馈页面
|-fix 售后页面
|-goodsDetail 值得买优惠详情页面
|-index 首页
|-jd 京东商品详情页面
|-login 登录页面
|-orderDetail 订单详情页面
|-seller 客服页面
|-service 退换/售后页面
|-shopCart 购物车页面
|-user 个人中心页面
|-style 公共样式
|-comment.wxss 评论区样式
|-goodsCard.wxss 商品卡片样式
|-nav.wxss 导航栏样式
|-orderCard.wxss 订单卡片样式
|-popright.wxss 筛选框样式
|-popup.wxss 上拉菜单样式
|-utils 公共模块
|-util.js promise封装接口
app.js 全局js
app.json 全局json配置
app.wxss 全局wxss
|
自定义组件
大部分人写小程序肯定要涉及修改navigationBar的title,微信小程序开发内置了这个组件,可以直接在app.json中配置。但是,自带的navigationBar的样子是固定的,你肯定见过长成下面这样的navigationBar:

相比平时常见的navigationBar,它左上角多了一个返回主页的按钮,这对于有多级页面的小程序来说是非常必要的,不然访问的层级太深用户不知道怎么返回主页。然而,小程序开发自带并没有这个样子的,好在可以自定义,接下来我们就来自定义一个。
navigationBar
首先,我们构建一下页面的结构:
|
1
2
3
4
5
6
7
8
9
10
11
12
13
14
15
16
17
18
19
|
<!-- components/navigationBar/index.wxml -->
<view class='nav-wrap' style='height: {{height*2 + 20}}px;'>
<!-- 导航栏 中间的标题 -->
<view class='nav-title' style='line-height: {{height*2 + 44}}px;'>{{navbarData.title}}</view>
<view style='display: flex; justify-content: space-around;flex-direction: column'>
<!-- 导航栏 左上角的返回按钮和home按钮 -->
<!-- 其中wx:if='{{navbarData.showCapsule}}' 是控制左上角按钮的显示隐藏,首页不显示 -->
<view class='nav-capsule' style='height: {{height*2 + 44}}px;' wx:if='{{navbarData.showCapsule}}'>
<!-- 左上角的返回按钮,wx:if='{{!share}}'空制返回按钮显示 -->
<view bindtap='_navback'>
<image src='../../assets/icons/back.png' mode='aspectFill' class='back-pre'></image>
</view>
<view class='navbar-v-line' wx:if='{{!share}}'></view>
<view bindtap='_backhome'>
<image src='../../assets/icons/back_home.png' mode='aspectFill' class='back-home'></image>
</view>
</view>
</view>
</view>
|
这就是一个很普通的页面结构,值得注意的是,它的高度是根据获取的设备的高度来确定的。
接下来又到了切图仔上线的时候了(误):
|
1
2
3
4
5
6
7
8
9
10
11
12
13
14
15
16
17
18
19
20
21
22
23
24
25
26
27
28
29
30
31
32
33
34
35
36
37
38
39
40
41
42
43
44
45
46
47
48
49
50
51
52
|
.nav-wrap {
position: fixed;
width: 100%;
top: 0;
background: #fff;
color: #000;
z-index: 9999999;
border-bottom: 1rpx solid #EFEFF4;
}
.nav-title {
position: absolute;
text-align: center;
max-width: 400rpx;
overflow: hidden;
text-overflow: ellipsis;
white-space: nowrap;
top: 0;
left: 0;
right: 0;
bottom: 0;
margin: auto;
font-size: 36rpx;
color: #2c2b2b;
}
.nav-capsule {
display: flex;
align-items: center;
margin-left: 30rpx;
width: 140rpx;
justify-content: space-between;
height: 100%;
}
.navbar-v-line {
width: 1px;
height: 32rpx;
background-color: #e5e5e5;
}
.back-pre, .back-home {
width: 32rpx;
height: 36rpx;
margin-top: 4rpx;
padding: 10rpx;
}
.nav-capsule .back-home {
width: 36rpx;
height: 40rpx;
margin-top: 3rpx;
}
|
|
1
2
3
4
5
6
7
8
9
10
11
12
13
14
15
16
17
18
19
20
21
22
23
24
25
26
27
28
29
30
31
32
33
34
35
36
|
const app = getApp()
Component({
properties: {
navbarData: {
type: Object,
value: {},
}
},
data: {
height: '',
navbarData: {
showCapsule: 1
}
},
attached: function () {
this.setData({
height: app.globalData.height
})
},
methods: {
_navback() {
wx.navigateBack()
},
_backhome() {
wx.switchTab({
url: '/pages/index/index',
})
}
}
})
|
京东优选小程序这里的两个按钮都是返回首页,我在开发的时候觉得不对劲,所以我改过来了。
在这里还去取了一下全局定义的变量,也就是获取的设备顶部窗口的高度(不同设备窗口高度不一样,根据这个来设置自定义导航栏的高度),在app.js中要定义一下:
|
1
2
3
4
5
6
7
8
9
10
11
12
13
14
15
|
app.js
App({
onLaunch: function () {
......
wx.getSystemInfo({
success: (res) => {
this.globalData.height = res.statusBarHeight
}
})
},
globalData: {
...
height: 0
}
})
|
记得自定组件的时候一定要在json中写成自定义组件
接下来就是调用该组件了
|
1
|
<navigationBar navbar-data='{{navbarData}}'></navigationBar>
|
别忘了在要引用页面的json中引入该组件
|
1
2
3
|
"usingComponents": {
"navigationBar": "../../components/navigationBar/index"
}
|
Toast
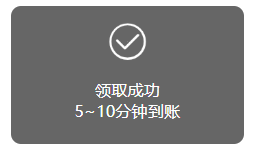
Toast同样也是小程序开发已经做好给你用的了,虽然它可以支持替换里面的图标,但是你会发现很鸡肋的一点是,如果你想显示两行文字你就没办法做到了。我在开发过程中也搜索过相关的实现方法,找到了大部分是说在要换行的文字后背加上rn就能实现了,但是我自己亲测无效,所以实在忍不住也自己做了一个。
|
1
2
3
4
5
6
7
8
9
|
<!-- components/toast/index.wxml -->
<!-- 距离顶部高度由业务需要动态确定 -->
<view class='mask' hidden="{{hide}}" style='top: {{toastData.top}}'>
<image class="image" src='../../assets/icons/{{toastData.icon}}.png' mode='aspectFit'></image>
<view class="info">
<view class='info1' wx:if="{{toastData.info1 != ''}}">{{toastData.info1}}</view>
<view class="info2" wx:if="{{toastData.info2 != ''}}">{{toastData.info2}}</view>
</view>
</view>
|
|
1
2
3
4
5
6
7
8
9
10
11
12
13
14
15
16
17
18
19
20
21
22
23
24
25
26
27
28
29
|
.mask {
width: 440rpx;
height: auto;
border-radius: 20rpx;
position: fixed;
left: 155rpx;
z-index: 1000;
background: rgba(0, 0, 0, 0.6);
text-align: center;
padding-bottom: 30rpx;
}
.image {
z-index: 1000;
width: 80rpx;
height: 80rpx;
padding-top: 30rpx;
padding-bottom: 20rpx;
}
.info1, .info2 {
color: #ffffff;
font-size: 32rpx;
}
.info {
display: flex;
flex-direction: column;
justify-content: center;
align-items: center;
}
|
|
1
2
3
4
5
6
7
8
9
10
11
12
13
14
15
16
17
18
19
20
21
22
23
24
25
26
27
28
29
30
|
// components/toast/index.js
Component({
properties: { //定义组件属性
toastData: { //用来显示提示信息
type: Object, // 类型(必填),目前接受的类型包括:String, Number, Boolean, Object, Array, null(表示任意类型)
value: {
icon: 'success'
} // 属性初始值(可选),如果未指定则会根据类型选择一个
},
},
data: {
hide: true
},
methods: {
showToast: function () {
let that = this;
that.setData({
hide: false
});
},
hideToast: function (e) {
let that = this;
setTimeout(function () {
that.setData({
hide: true
});
}, 2000);
}
}
})
|
这里给组件定义了两个方法,是用来显示和隐藏Toast的。这里要注意一下,调用给自定义组件定义方法要先在页面上获取该组件
|
1
|
<toast id="toast" toast-data="{{toastData}}"></toast>
|
|
1
2
3
4
5
6
7
8
9
10
11
12
|
Page({
data: {
toastData: {
icon: "success",
info1: "加入购物车成功",
top: "50%"
}
},
onReady() {
this.toast = this.selectComponent("#toast");
}
})
|
然后在需要触发Toast的事件中写上这两句:
|
1
2
|
this.toast.showToast()
this.toast.hideToast()
|
功能实现
导航
所谓导航,也是很常见了,就是根据选择栏目的不同,显示不同的类别内容。例如:
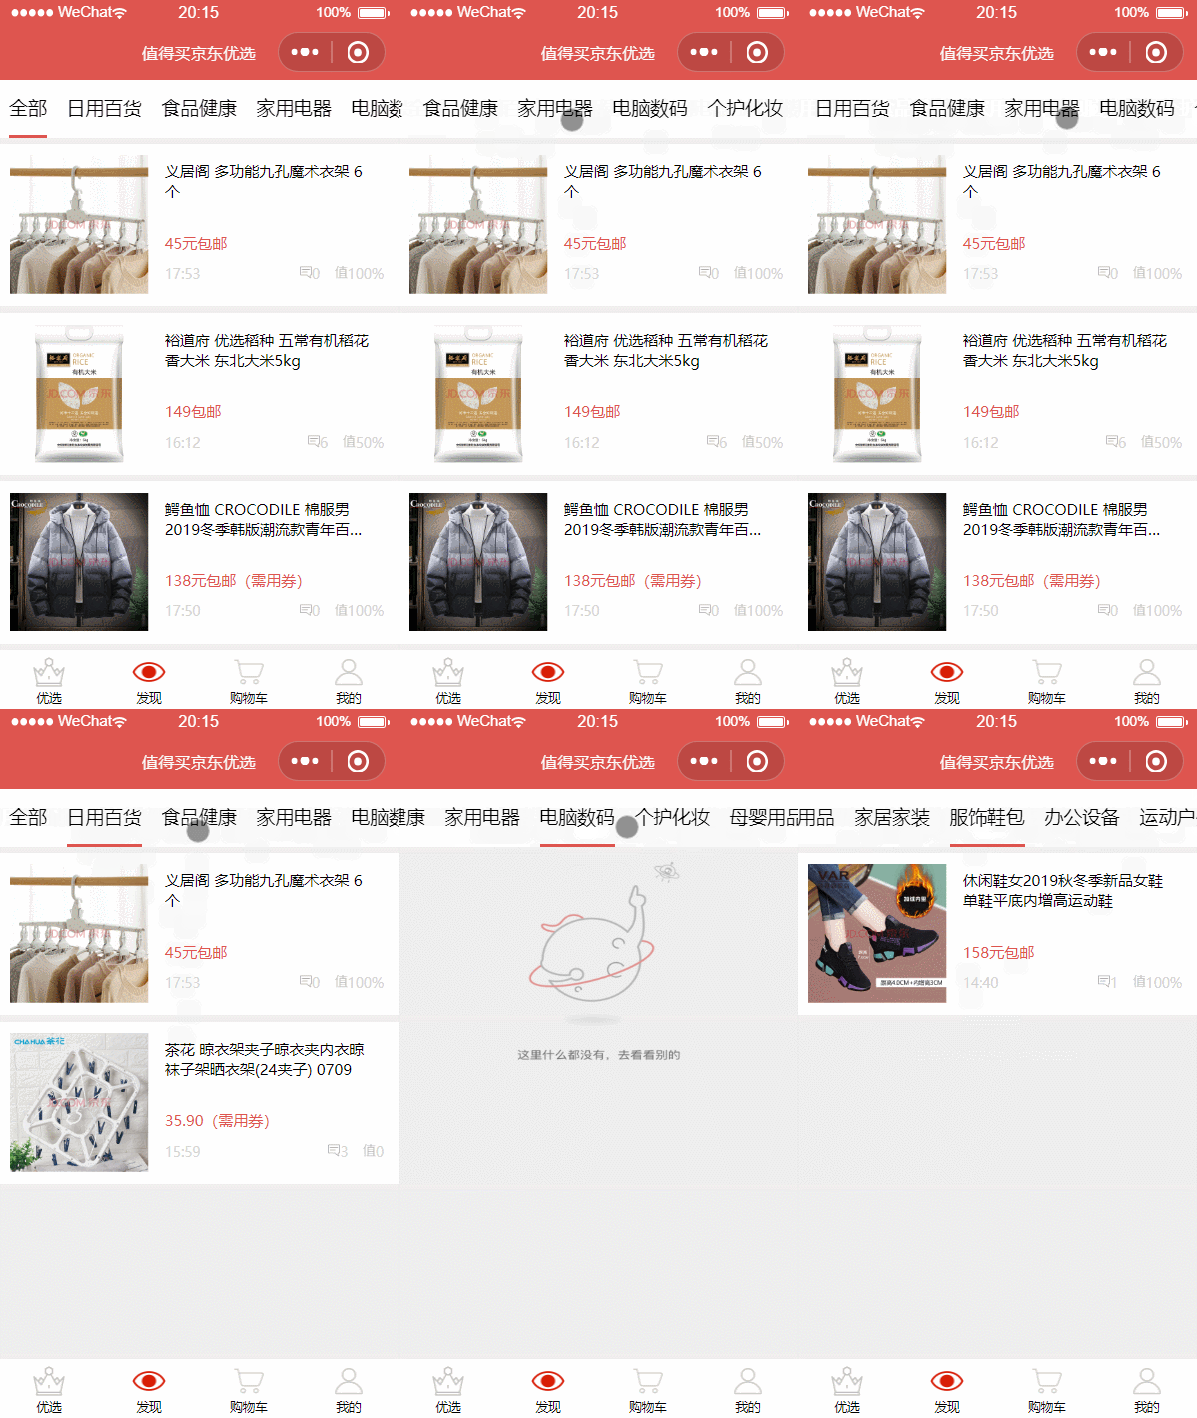
功能要求:
-
点击导航栏目,显示对应的栏目数据。
-
如果栏目中没有东西,要显示对应的提示信息。
实现它的功能并不难,直接sroll-view往上怼。个人觉得,京东优选在这里有一点不足的地方就是,如果点击了偏右侧的导航栏目的话,导航条不会跟着右移显示后面的项目,可能它的开发者有不一样的想法吧。
|
1
2
3
4
5
6
7
8
9
|
<view class="navigator">
<scroll-view scroll-x="true" class="nav" scroll-left="{{navScrollLeft}}" scroll-with-animation="{{true}}">
<block wx:for="{{navData}}" wx:for-index="id" wx:for-item="navItem" wx:key="id">
<view class="nav-item {{currentTab == id?'active':''}}" data-name="{{navItem.name}}" data-current="{{id}}" bindtap="switchNav">
{{navItem.name}}
</view>
</block>
</scroll-view>
</view>
|
通过js可以实现动态的填放数据,这里设置的current就是当前选择的栏目,可以根据这个改变样式等。
|
1
2
3
4
5
6
7
8
9
10
11
12
13
14
15
16
17
18
19
|
switchNav(e) {
const cur = e.currentTarget.dataset.current;
let currData = []
if (cur === 0) {
currData = this.data.goods
} else {
this.data.goods.forEach(val => {
if (val.category === cur.toString()) {
currData.push(val)
}
})
}
this.setData({
currentTab: cur,
category: cur,
currData
});
}
|
如果是要实现点击之后自动向点击的方法滑出显示更多的内容,可以通过动态改变navScrollLeft的值去实现,这里我就不细说了,不过我在实现的时候还是花了一番功夫,实现的不是很好所以就没有放在代码里,如果你以后想做出这种效果的导航栏建议去网上搜一搜demo看懂了之后借过来用一用,毕竟传说程序猿最高的境界是复制粘贴,狗头(误)
上拉菜单和筛选框
这两个比较相似,只是拉出的位置不一样,这里我就举一个筛选框的例子,我们先看看它长啥样:
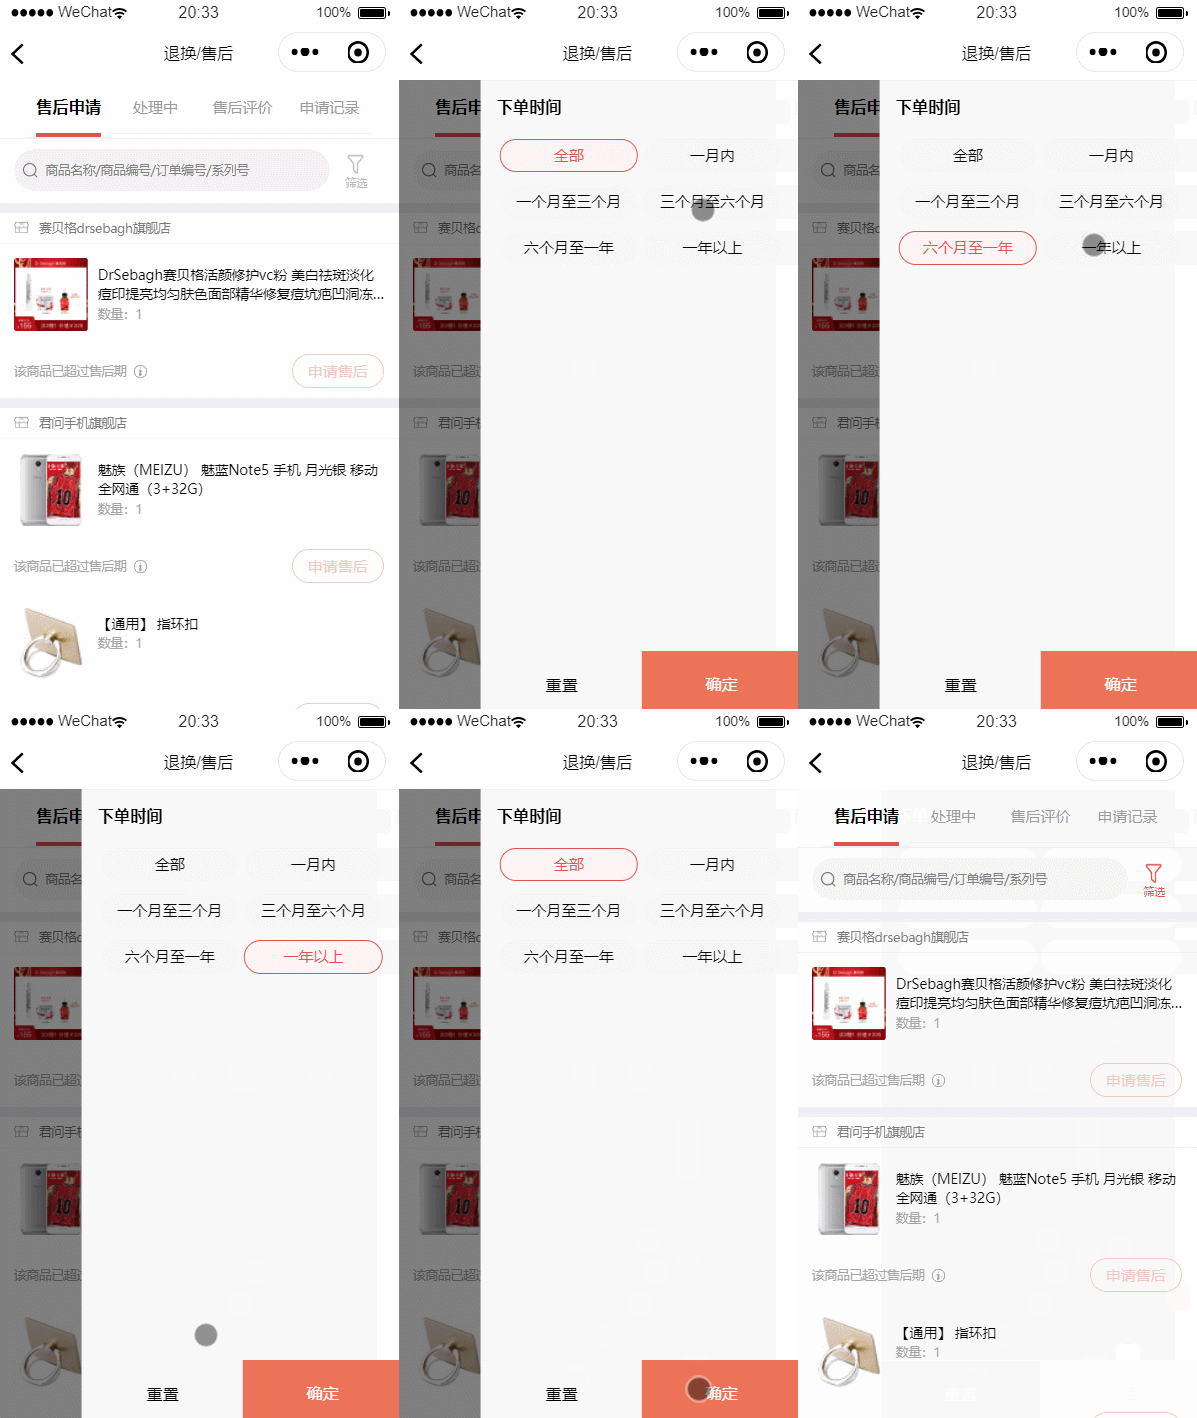
我们先看看结构,这里我省略了中间的一些内容:
|
1
2
3
4
5
6
7
8
9
10
11
|
<view class="float {{isRuleTrue?'isRuleShow':'isRuleHide'}}">
<view class="animation-element" animation="{{animation}}">
...中间自己放的具体内容...
<view class='bottom'>
<view class="animation-reset" bindtap="reset">重置</view>
<view class="animation-button" bindtap="success">确定</view>
</view>
</view>
</view>
|
|
1
2
3
4
5
6
7
8
9
10
11
12
13
14
15
16
17
18
19
20
21
22
23
24
25
26
27
28
29
30
31
32
33
34
35
36
37
38
39
40
41
42
43
44
45
46
47
48
49
50
51
52
53
54
55
56
57
58
59
60
|
.isRuleShow {
display: block;
}
.isRuleHide {
display: none;
}
.float {
height: 100%;
width: 100%;
position: fixed;
z-index: 999;
top: 0;
left: 0;
background-color: rgba(0, 0, 0, 0.5);
padding-left: 30rpx;
padding-left: 30rpx;
}
.animation-element {
width: 600rpx;
height: 100%;
padding-left: 30rpx;
padding-right: 30rpx;
background-color: #ffffff;
border: 1px solid #f3f0f0;
position: absolute;
right: -550rpx;
box-sizing: border-box;
}
.bottom {
width: 600rpx;
height: 110rpx;
font-size: 32rpx;
padding-top: 55rpx;
position: absolute;
bottom: 0;
left: 0;
right: 0;
display: flex;
}
.animation-reset {
width: 50%;
height: 100%;
line-height: 50%;
text-align: center;
padding-top: 55rpx;
border-top: 1px solid #EFEFF4;
}
.animation-button {
width: 50%;
height: 100%;
line-height: 50%;
color: #fff;
text-align: center;
background-color: #ED7358;
padding-top: 55rpx;
}
|
重点是它的显示和隐藏事件,需要用到animation,如果有不熟悉animation,可以去参考一些资料,或者是。同样,我也去掉了我实现其他业务的一些内容。
|
1
2
3
4
5
6
7
8
9
10
11
12
13
14
15
16
|
showSelect() {
this.setData({
isRuleTrue: true
})
this.animation.translate(-245, 0).step()
this.setData({ animation: this.animation.export() })
},
success: function () {
this.setData({
isRuleTrue: false,
selected: true
})
this.animation.translate(0, 0).step()
this.setData({ animation: this.animation.export() })
},
|
购物车逻辑
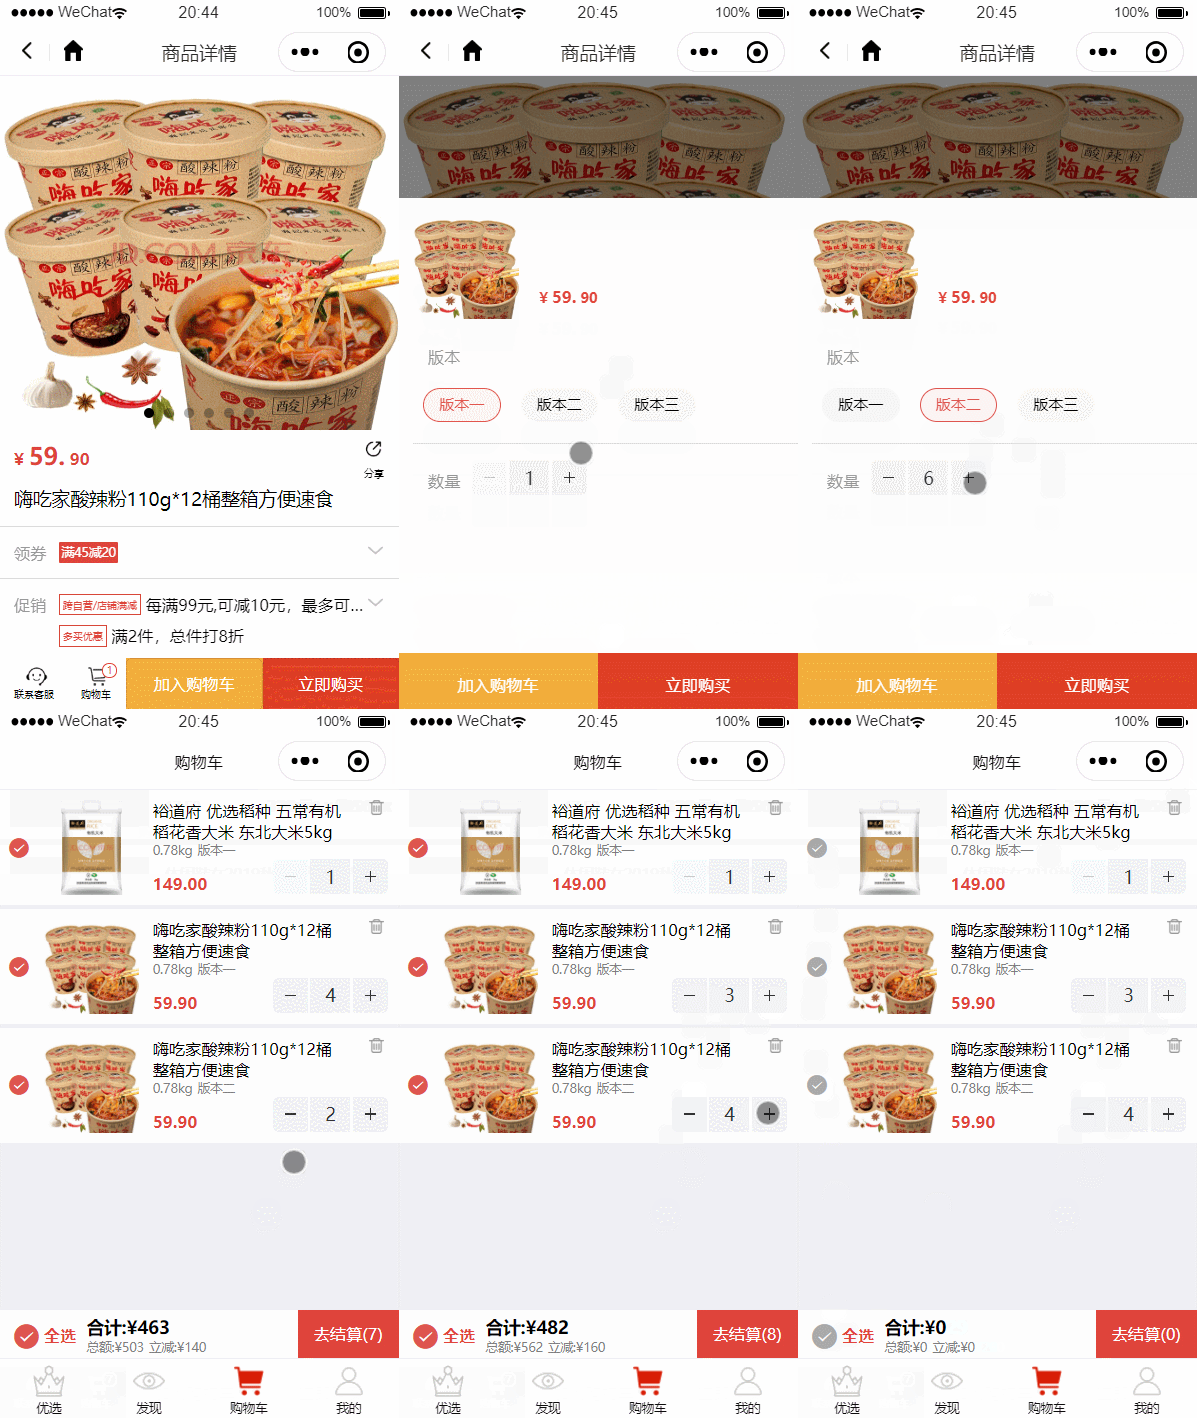
要实现这样的效果并不困难,需要自己思路清晰,不能被绕进去了。实现加入购物车并不难,细节是购物车图标右上角的数字要根据加入购物车的数量进行动态的改变,还要注意如果是同一件商品就不需要添加新的,只需要修改原来的数量。
在这里我使用的是小程序的wx.setStorage()实现的:
|
1
2
3
4
|
<view class='bottom'>
<view class="animation-reset" bindtap="addCart">加入购物车</view>
<view class="animation-button" bindtap="buy">立即购买</view>
</view>
|
|
1
2
3
4
5
6
7
8
9
10
11
12
13
14
15
16
17
18
19
20
21
22
23
24
25
26
27
28
29
30
31
32
33
34
35
36
37
38
39
40
41
42
43
44
45
46
47
|
addCart() {
this.setData({
toastData: {
icon: "success",
info1: "加入购物车成功",
top: "50%"
}
})
this.toast.showToast()
this.toast.hideToast()
this.hideModal()
let cartData = wx.getStorageSync('cart') || [];
let count = 0
cartData.map(val => {
if (val.title === this.data.currData[0].title && val.type === this.data.choose_value) {
val.num += this.data.num
count++
}
})
if (count === 0) {
let data = {
id: this.data.currData[0]._id,
title: this.data.currData[0].title,
weight: "0.78kg",
type: this.data.choose_value,
num: this.data.num,
price: this.data.currData[0].plain_price,
img: this.data.currData[0].thumb,
discount: 20,
select: true
}
cartData.push(data)
}
let allNum = 0
cartData.forEach(val => {
allNum += val.num
});
this.setData({
allNum
})
wx.setStorage({
key: 'cart',
data: cartData
})
},
|
这里你可以根据自己的开发来决定方式,如果你使用的是云开发的话,可以选择把数据存进云数据库里。
回到顶部
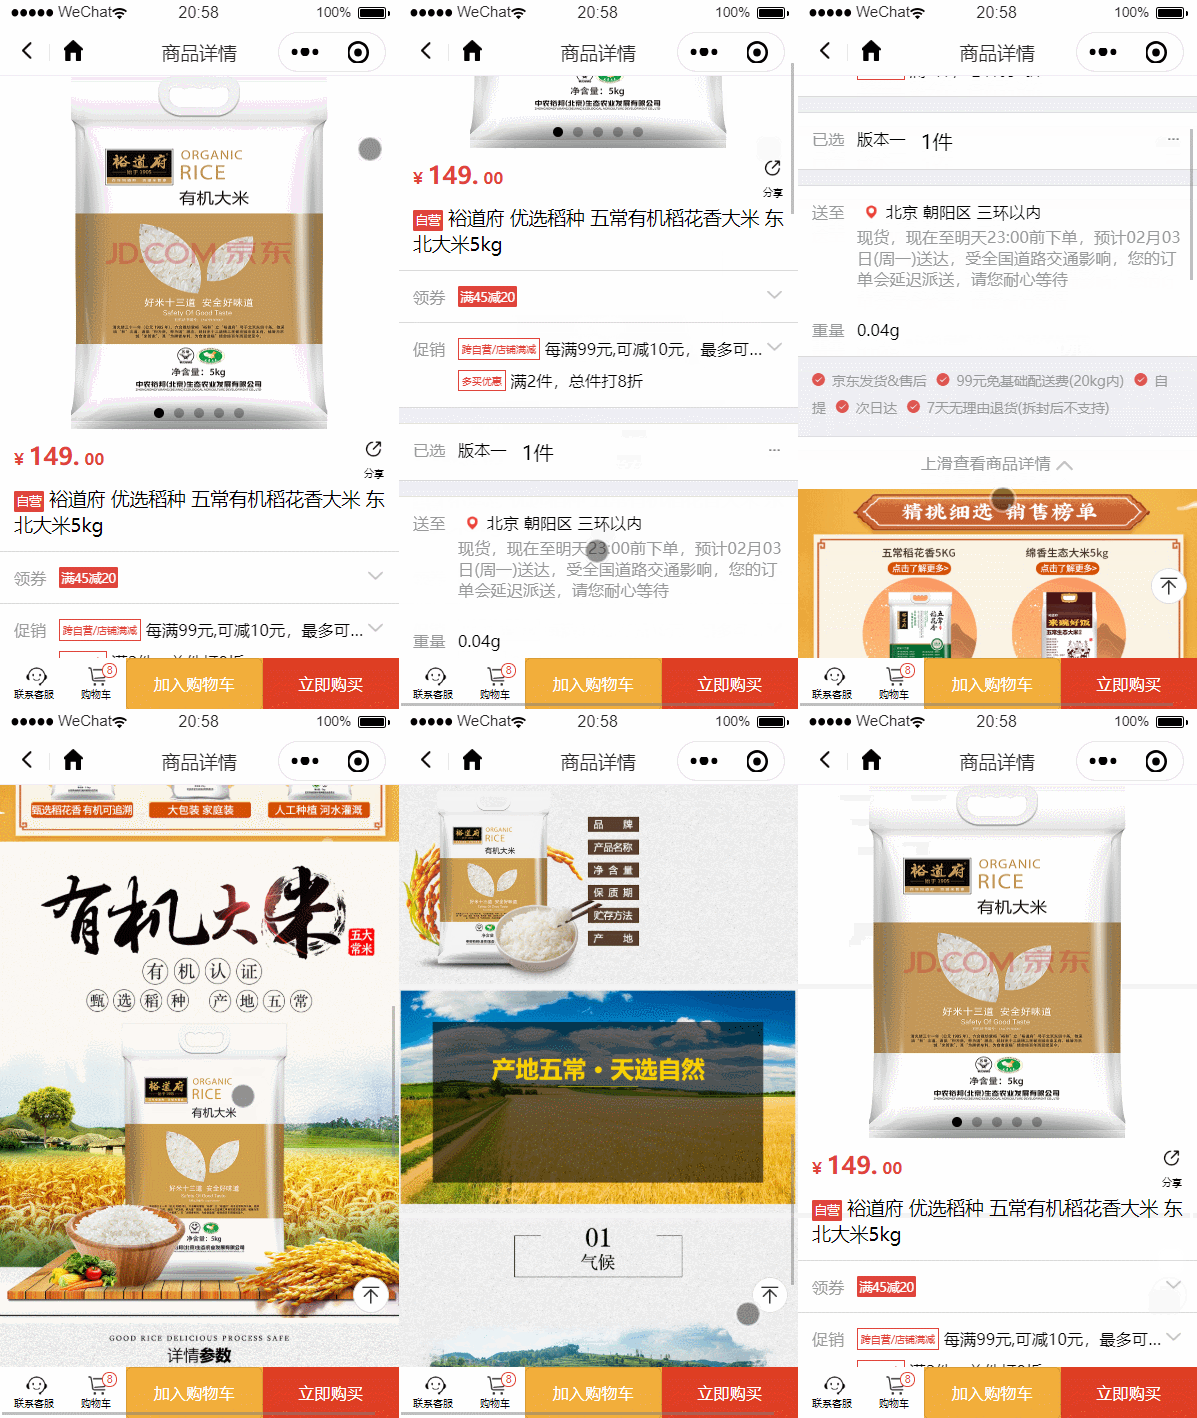
这也是一个老生常谈的功能,当你滑到页面比较后的位置的时候需要快速回顶。这里要记住,用swiper实现。首先是在页面上撸一个回到顶部的图标出来:
|
1
2
3
4
5
6
7
8
9
10
|
<scroll-view class="bigWrap"
scroll-y="true"
scroll-top="{{scrollTop}}"
bindscroll="scroll"
style="position: absolute; left: 0; top:0; bottom: 0; right: -999rpx;">
<view class="goTop" bindtap="goTop" wx:if="{{&& floorstatus}}">
<image class="icon_goTop" src="../../assets/icons/back_to_top.png"></image>
</view>
</scroll-view>
|
{{scrollTop}}用来表示滑动的时候距离顶部的位置。它的样式也很简单,使用固定定位把它定在屏幕上,这里一定要注意页面的层级,不然它可能会被其他组件给遮挡掉!
|
1
2
3
4
5
6
7
8
9
10
11
12
13
14
15
16
17
18
|
.goTop {
position: fixed;
bottom: 200rpx;
right: 20rpx;
width: 65rpx;
height: 65rpx;
border: 1px solid #DDDDDD;
border-radius: 50%;
background-color: #fff;
text-align: center;
}
.icon_goTop {
width: 40rpx;
height: 40rpx;
padding-top: 12rpx;
padding-left: 2rpx;
}
|
|
1
2
3
4
5
|
goTop(e) {
this.setData({
scrollTop: 0
})
}
|
你肯定也注意到了,当滑到了一定距离的时候它才显示出来,这就要靠swiper绑定的滚动事件了:
|
1
2
3
4
5
6
7
8
9
10
|
scroll(e) {
let floorstatus = false
if (e.detail.scrollTop > 300) {
floorstatus = true
}
this.setData({
floorstatus
})
}
|
功能大致先说这么一点,可能在大牛看起来都是些很容易不起眼的功能,但是对应我这个初学者来说还是有点困难的,希望如果有大牛看了我的一些功能的实现之后我不会被骂死。
值得注意的一点
做过小程序开发或者是vue等开发的人一定听过事件冒泡这个名词:子元素的事件触发了父元素的事件,例如点击事件。我就是那个幸运鹅,我在开发的时候就遇到了这个情况。
在购物车中点击商品可以跳转商品详情,但是我一开始把跳转事件绑定在了每个商品卡片上,这样就导致了点击修改商品数量的时候修改了数字但是也会直接跳转商品详情,比如下面这样...
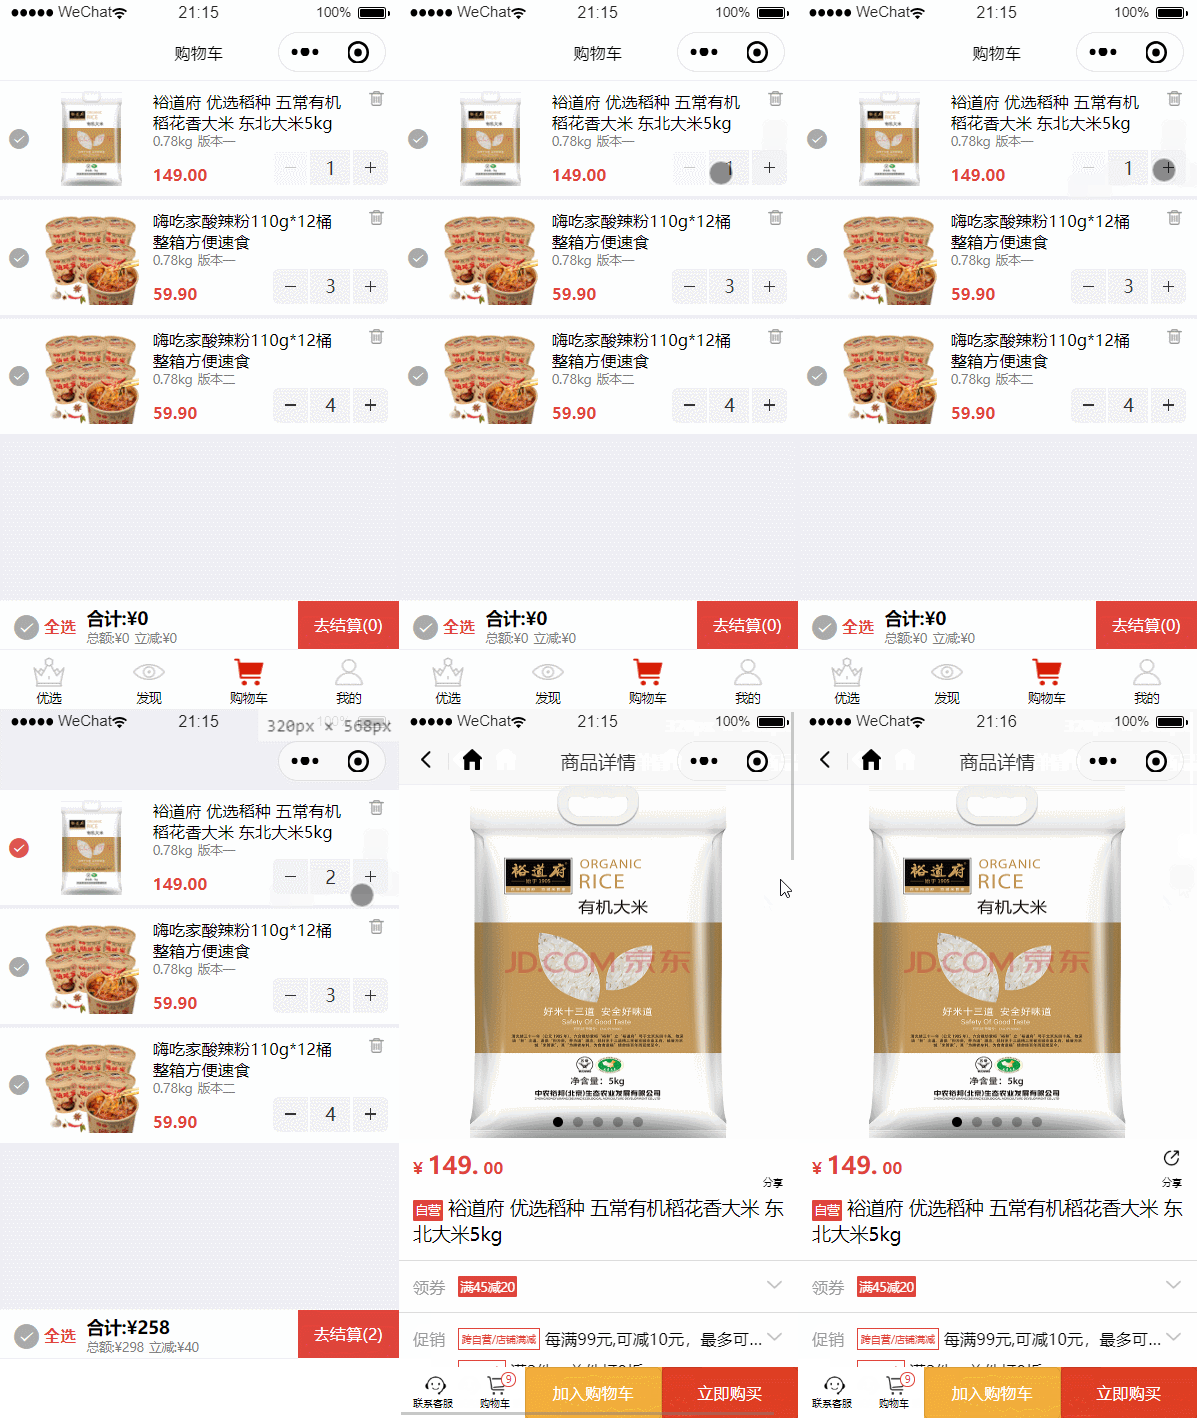
这就很不友好了,用户体验很差,关于事件冒泡,微信小程序的解决方法是把bindtap替换成catchtap,这样可以阻止子元素事件向上冒泡。
然而巧的是,我就是那个最幸运的鹅,步进器我用的是有赞Vant Weapp组件库里的,我搜索了很多资料都没有找到有效的解决方案,差点就放弃使用组件库了,好在最后发现京东优选小程序购物车绑定的跳转事件是在商品的图片和标题上。
这一点还是比较重要的,所以大家在开发的时候一定要考虑事件的冒泡,这也是我把它放在最后来写的原因。
写在后面
最后,我想说的是小程序开发真的不容易,开发一个好的小程序更是需要考虑性能和用户体验的方方面面。当我觉得自己第一个小程序差不多要完工的时候真的要跳起来唱joyful了(误)。作为一个程序猿真的不容易,难怪是个容易掉发的群体。但好在愿意分享技术的人很多,在这次开发的过程中我也查阅了很多的资料、社区和文档。小程序的学习我也不会停下脚步,这个项目还有非常多做的不好的地方,我发出来也是希望大家和我进行交流分享,后期我也会继续完善优化这个小程序项目。希望我的作品可以对那些初学小程序的人有所帮助。
最后附上我的github项目地址:
如果你觉得这个项目还不错或者是对你有所帮助的话欢迎star,你点亮的每一个star将都是我前进的动力!