广告位联系
返回顶部
分享到

YOLOv8模型pytorch格式转为onnx格式的步骤介绍

python 来源:互联网 作者:佚名 发布时间:2024-12-03 21:34:41 人浏览
摘要

一、YOLOv8的Pytorch网络结构 yolov8网络从1-21层与pt文件相对应是BackBone和Neck模块,22层是Head模块。 二、转ONNX步骤 2.1 yolov8官方 1 2 3 4 5 6 7 8 9 10 代码解释 pt模型转为onnx格式 import os from ultralytics i

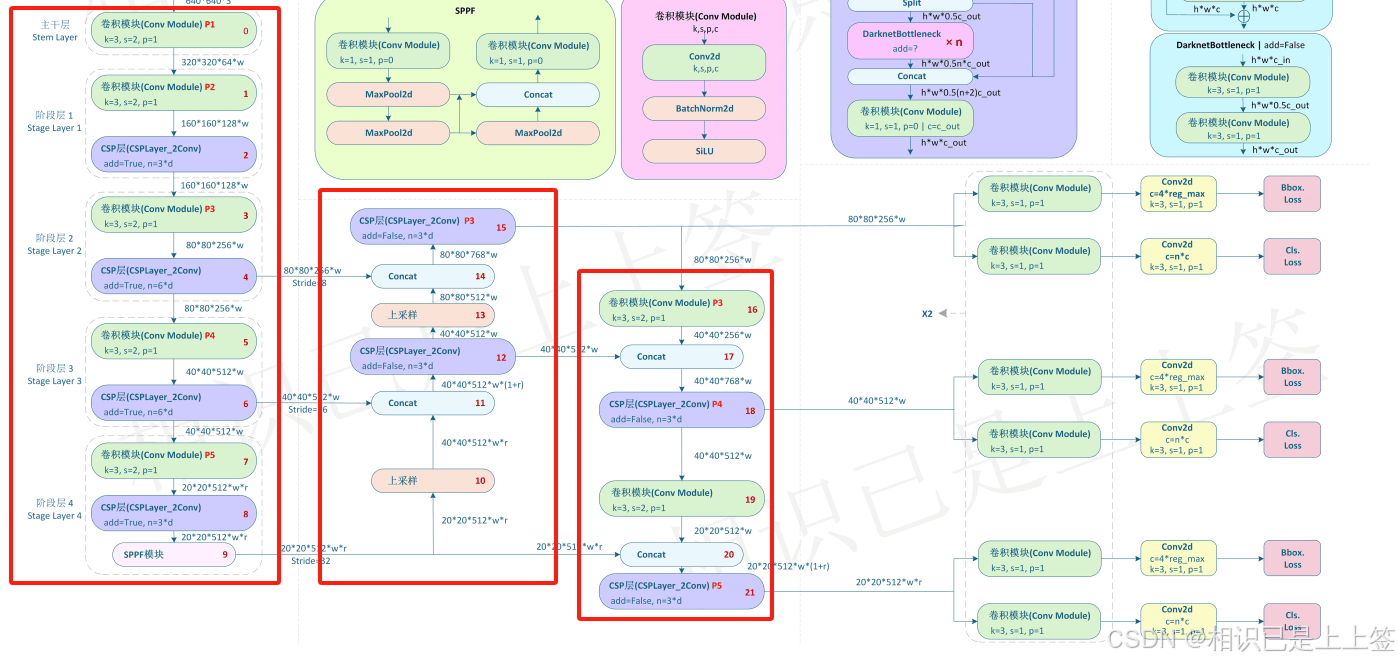
一、YOLOv8的Pytorch网络结构

yolov8网络从1-21层与pt文件相对应是BackBone和Neck模块,22层是Head模块。

二、转ONNX步骤

2.1 yolov8官方

1

2

3

4

5

6

7

8

9

10

"""

代码解释

pt模型转为onnx格式

"""

import os

from ultralytics import YOLO

model = YOLO("weights/best.pt")

success = model.export(format="onnx")


print("导出成功!")

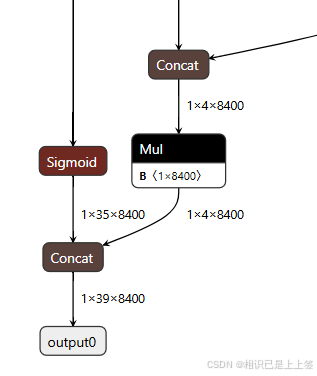
将pytorch转为onnx后,pytorch支持的一系列计算就会转为onnx所支持的算子,若没有相对应的就会使用其他方式进行替换(比如多个计算替换其单个)。比较常见是conv和SiLU合并成一个Conv模块进行。

其中,1*4*8400表示每张图片预测 8400 个候选框,每个框有 4 个参数边界框坐标 (x,y,w,h)。 1*35*8400类同,1和4800代表意义相同,35是类别属性包含了其置信度概率值。

最后两个输出Concat操作,得到1*39*8400。最后根据这个结果去进行后续操作。

2.2 自定义转换

所谓的自定义转换其实是在转onnx时,对1*39*8400多加了一系列自定义操作例如NMS等。

2.2.1 加载权重并优化结构

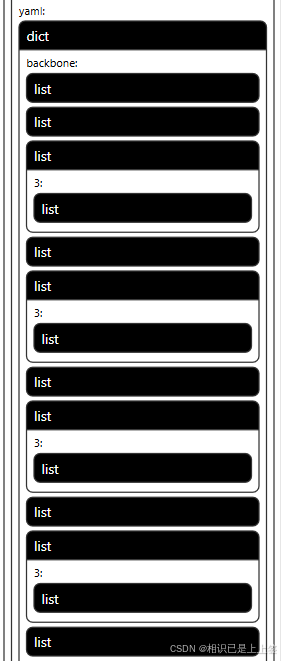
1

2

YOLOv8 = YOLO(args.weights) #替换为自己的权重

model = YOLOv8.model.fuse().eval()

2.2.2 后处理检测模块

1

2

3

4

5

6

7

8

9

10

11

12

13

14

15

16

17

18

19

20

21

22

23

24

25

26

27

28

29

30

31

32

33

34

35

36

37

38

39

40

41

42

43

44

45

46

47

48

49

50

51

52

53

54

55

56

57

58

59

60

61

62

63

64

65

66

67

68

69

70

71

72

73

74

75

76

77

78

79

80

81

82

83

84

85

86

87

88

89

90

91

92

93

94

95

96

97

98

99

100

101

102

103

104

105

106

107

108

109

110

111

112

113

114

115

116

117

118

119

120

121

122

123

124

125

126

127

128

129

130

131

132

133

134

135

136

137

138

139

140

141

142

143

144

145

146

147

148

149

150

151

152

153

154

155

156

157

158

159

160

161

162

163

164

165

166

167

168

169

170

171

172

173

def gen_anchors(feats: Tensor,

                 strides: Tensor,

                 grid_cell_offset: float = 0.5) -> Tuple[Tensor, Tensor]:

    """

    生成锚点,并计算每个锚点的步幅。


    参数:

    feats (Tensor): 特征图,通常来自不同的网络层。

    strides (Tensor): 每个特征图的步幅(stride)。

    grid_cell_offset (float): 网格单元的偏移量,默认为0.5。


    返回:

    Tuple[Tensor, Tensor]: 锚点的坐标和对应的步幅张量。

    """

    anchor_points, stride_tensor = [], []

    assert feats is not None  # 确保输入的特征图不为空

    dtype, device = feats[0].dtype, feats[0].device  # 获取特征图的数据类型和设备


    # 遍历每个特征图,计算锚点

    for i, stride in enumerate(strides):

        _, _, h, w = feats[i].shape  # 获取特征图的高(h)和宽(w)

        sx = torch.arange(end=w, device=device,

                          dtype=dtype) + grid_cell_offset  # 计算 x 轴上的锚点位置

        sy = torch.arange(end=h, device=device,

                          dtype=dtype) + grid_cell_offset  # 计算 y 轴上的锚点位置

        sy, sx = torch.meshgrid(sy, sx)  # 生成网格坐标

        anchor_points.append(torch.stack((sx, sy), -1).view(-1, 2))  # 将 x 和 y 组合成坐标点

        stride_tensor.append(

            torch.full((h * w, 1), stride, dtype=dtype, device=device))  # 生成步幅张量


    return torch.cat(anchor_points), torch.cat(stride_tensor)  # 返回合并后的锚点和步幅


class customize_NMS(torch.autograd.Function):

    """

    继承torch.autograd.Function

    用于TensorRT的非极大值抑制(NMS)自定义函数。

    """


    @staticmethod

    def forward(

            ctx: Graph,

            boxes: Tensor,

            scores: Tensor,

            iou_threshold: float = 0.65,

            score_threshold: float = 0.25,

            max_output_boxes: int = 100,

            background_class: int = -1,

            box_coding: int = 0,

            plugin_version: str = '1',

            score_activation: int = 0

    ) -> Tuple[Tensor, Tensor, Tensor, Tensor]:

        """

        正向计算NMS输出,模拟真实的TensorRT NMS过程。


        参数:

        boxes (Tensor): 预测的边界框。

        scores (Tensor): 预测框的置信度分数。

        其他参数同样为NMS的超参数。


        返回:

        Tuple[Tensor, Tensor, Tensor, Tensor]: 包含检测框数量、框坐标、置信度分数和类别标签。

        """

        batch_size, num_boxes, num_classes = scores.shape  # 获取批量大小、框数量和类别数

        num_dets = torch.randint(0,

                                 max_output_boxes, (batch_size, 1),

                                 dtype=torch.int32)  # 随机生成检测框数量(仅为模拟)

        boxes = torch.randn(batch_size, max_output_boxes, 4)  # 随机生成预测框

        scores = torch.randn(batch_size, max_output_boxes)  # 随机生成分数

        labels = torch.randint(0,

                               num_classes, (batch_size, max_output_boxes),

                               dtype=torch.int32)  # 随机生成类别标签


        return num_dets, boxes, scores, labels  # 返回模拟的结果


    @staticmethod

    def symbolic(

            g,

            boxes: Value,

            scores: Value,

            iou_threshold: float = 0.45,

            score_threshold: float = 0.25,

            max_output_boxes: int = 100,

            background_class: int = -1,

            box_coding: int = 0,

            score_activation: int = 0,

            plugin_version: str = '1') -> Tuple[Value, Value, Value, Value]:

        """

        计算图的符号函数,供TensorRT使用。


        参数:

        g: 计算图对象

        boxes (Value), scores (Value): 传入的边界框和得分

        其他参数是用于配置NMS的参数。


        返回:

        经过NMS处理的检测框、得分、类别标签及检测框数量。

        """

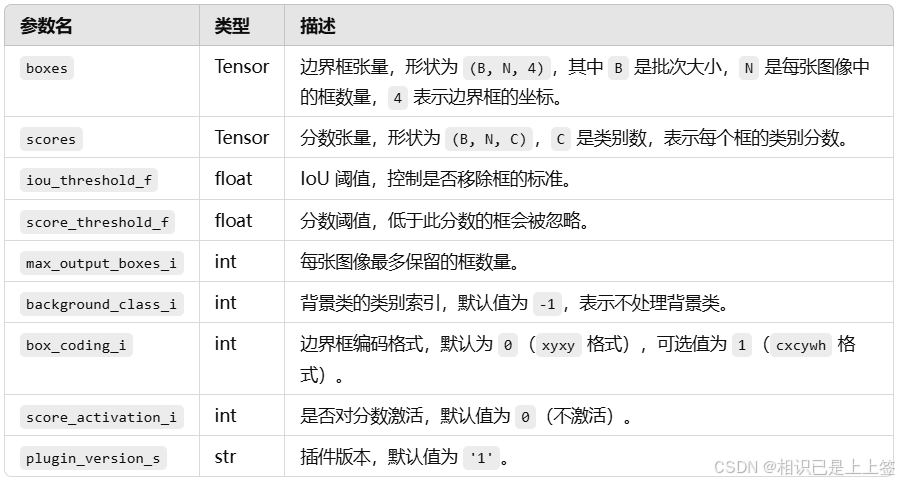
        out = g.op('TRT::EfficientNMS_TRT',

                   boxes,

                   scores,

                   iou_threshold_f=iou_threshold,

                   score_threshold_f=score_threshold,

                   max_output_boxes_i=max_output_boxes,

                   background_class_i=background_class,

                   box_coding_i=box_coding,

                   plugin_version_s=plugin_version,

                   score_activation_i=score_activation,

                   outputs=4)  # 使用TensorRT的EfficientNMS插件


        nums_dets, boxes, scores, classes = out  # 获取输出的检测框数量、框坐标、得分和类别

        return nums_dets, boxes, scores, classes  # 返回结果


class Post_process_Detect(nn.Module):

    """

    用于后处理的检测模块,执行检测后的非极大值抑制(NMS)。

    """

    export = True

    shape = None

    dynamic = False

    iou_thres = 0.65  # 默认的IoU阈值

    conf_thres = 0.25  # 默认的置信度阈值

    topk = 100  # 输出的最大检测框数量


    def __init__(self, *args, **kwargs):

        super().__init__()


    def forward(self, x):

        """

        执行后处理操作,提取预测框、置信度和类别。


        参数:

        x (Tensor): 输入的特征图。


        返回:

        Tuple[Tensor, Tensor, Tensor]: 预测框、置信度和类别。

        """

        shape = x[0].shape  # 获取输入的形状

        b, res, b_reg_num = shape[0], [], self.reg_max * 4

        # b为特征列表第一个元素的批量大小,表示处理的样本数量,

        # res声明一个空列表存储处理过的特征图

        # b_reg_num为回归框的数量

        #遍历特征层(self.nl表示特征层数),将每一层的框预测和分类预测拼接。

        for i in range(self.nl):

            res.append(torch.cat((self.cv2[i](x[i]), self.cv3[i](x[i])), 1))  # 特征拼接

        # 调用

        # make_anchors

        # 生成锚点和步幅,用于还原边界框的绝对坐标。

        if self.dynamic or self.shape != shape:

            self.anchors, self.strides = (x.transpose(

                0, 1) for x in gen_anchors(x, self.stride, 0.5))  # 生成锚点和步幅

            self.shape = shape  # 更新输入的形状


        x = [i.view(b, self.no, -1) for i in res]  # 调整特征图形状


        y = torch.cat(x, 2)  # 拼接所有特征图

        boxes, scores = y[:, :b_reg_num, ...], y[:, b_reg_num:, ...].sigmoid()  # 提取框和分数

        boxes = boxes.view(b, 4, self.reg_max, -1).permute(0, 1, 3, 2)  # 变换框的形状

        boxes = boxes.softmax(-1) @ torch.arange(self.reg_max).to(boxes)  # 对框进行softmax处理

        boxes0, boxes1 = -boxes[:, :2, ...], boxes[:, 2:, ...]  # 分离框的不同部分

        boxes = self.anchors.repeat(b, 2, 1) + torch.cat([boxes0, boxes1], 1)  # 合并框坐标

        boxes = boxes * self.strides  # 乘以步幅


        return customize_NMS.apply(boxes.transpose(1, 2), scores.transpose(1, 2),

                             self.iou_thres, self.conf_thres, self.topk)  # 执行NMS


def optim(module: nn.Module):

    setattr(module, '__class__', Post_process_Detect)


for item in model.modules():

    optim(item)

    item.to(args.device) #输入cpu或者gpu的卡号

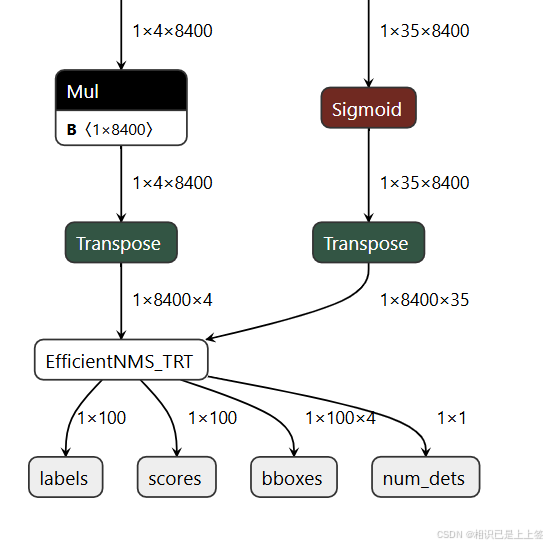
自定义这里是在yolo官方得到的1*4*8400和1*35*8400进行矩阵转换2<->3,最后引入EfficientNMS_TRT插件后处理,可以有效加速NMS处理。

2.2.3  EfficientNMS_TRT插件

EfficientNMS_TRT 是 TensorRT 中的一个高效非极大值抑制 (NMS) 插件,用于快速过滤检测框。它通过优化的 CUDA 实现来执行 NMS 操作,特别适合于深度学习推理阶段中目标检测任务的后处理。支持在一个批次中对多个图像同时执行 NMS。

输出结果为num_dets, detection_boxes, detection_scores, detection_classes ,分别代表经过 NMS 筛选后保留的边界框数,每张图片保留的检测框的坐标,每张图片中保留下来的检测框的分数(由高到低),每个保留下来的边界框的类别索引。


版权声明 : 本文内容来源于互联网或用户自行发布贡献,该文观点仅代表原作者本人。本站仅提供信息存储空间服务和不拥有所有权,不承担相关法律责任。如发现本站有涉嫌抄袭侵权, 违法违规的内容, 请发送邮件至2530232025#qq.cn(#换@)举报,一经查实,本站将立刻删除。
原文链接 :
相关文章
  • 本站所有内容来源于互联网或用户自行发布,本站仅提供信息存储空间服务,不拥有版权,不承担法律责任。如有侵犯您的权益,请您联系站长处理!
  • Copyright © 2017-2022 F11.CN All Rights Reserved. F11站长开发者网 版权所有 | 苏ICP备2022031554号-1 | 51LA统计