由于项目依赖的jar越来越多,Springboot默认的打包方式是将整个项目打包成一个jar包,每次发布时,打包后的jar越来越大,更新一个很小的功能,需要将整个jar上传运行。这样效率太低了,考虑实现每次发布时,只发布修改了的部分,实现增量发布。
二、实现思路
1.将整体打包的jar进行拆分:
拆为引用的lib和resource(静态资源)两部分(准确说是三部分,还包括当前项目的jar)
2.通过命令:java -Dloader.path=./lib,./resource -jar demo-exec.jar 来指定资源路径运行。
三、实现步骤
1.打包当前web项目
打包当前web项目时,排除引用的jar,只打包成可运行的jar。
修改项目pom.xml文件,在build->plugins里增加:
|
1 2 3 4 5 6 7 8 9 10 11 12 13 14 15 16 17 18 19 20 21 22 23 24 |
<!--1.打包当前web项目--> <plugin> <groupId>org.springframework.boot</groupId> <artifactId>spring-boot-maven-plugin</artifactId> <configuration> <!-- 指定该jar包启动时的主类--> <mainClass>com.rc114.bms.RbApplication</mainClass>
<!-- 模块打包需要增加这个配置,带exec的为可执行jar,不带的为可引用jar--> <classifier>exec</classifier> <includeSystemScope>true</includeSystemScope>
<!--必须为ZIP模式,不指定的话-Dloader.path不生效--> <layout>ZIP</layout>
<!-- 打包的时候排除的jar包--> <includes> <include> <groupId>non-exists</groupId> <artifactId>non-exists</artifactId> </include> </includes> </configuration> </plugin> |
注意:这里使用的是 spring-boot-maven-plugin 插件。
2.打包依赖项lib
修改项目pom.xml文件,在build->plugins里增加:
|
1 2 3 4 5 6 7 8 9 10 11 12 13 14 15 16 17 18 19 20 21 |
<!--2.打包依赖项--> <plugin> <groupId>org.apache.maven.plugins</groupId> <artifactId>maven-dependency-plugin</artifactId> <version>3.2.0</version> <!-- 使用适合你的版本 --> <executions> <execution> <id>copy-dependencies</id> <phase>prepare-package</phase> <goals> <goal>copy-dependencies</goal> </goals> <configuration> <outputDirectory>${project.build.directory}/lib</outputDirectory> <overWriteReleases>false</overWriteReleases> <overWriteSnapshots>false</overWriteSnapshots> <overWriteIfNewer>true</overWriteIfNewer> </configuration> </execution> </executions> </plugin> |
注意:这里使用的是 maven-dependency-plugin 插件。
完整的 build 配置:
|
1 2 3 4 5 6 7 8 9 10 11 12 13 14 15 16 17 18 19 20 21 22 23 24 25 26 27 28 29 30 31 32 33 34 35 36 37 38 39 40 41 42 43 44 45 46 47 48 49 50 |
<build> <plugins> <!--1.打包当前web项目--> <plugin> <groupId>org.springframework.boot</groupId> <artifactId>spring-boot-maven-plugin</artifactId> <configuration> <!-- 指定该jar包启动时的主类--> <mainClass>com.rc114.bms.RbApplication</mainClass>
<!-- 模块打包需要增加这个配置,带exec的为可执行jar,不带的为可引用jar--> <classifier>exec</classifier> <includeSystemScope>true</includeSystemScope>
<!--必须为ZIP模式,不指定的话-Dloader.path不生效--> <layout>ZIP</layout>
<!-- 打包的时候排除的jar包--> <includes> <include> <groupId>non-exists</groupId> <artifactId>non-exists</artifactId> </include> </includes> </configuration> </plugin>
<!--2.打包依赖项--> <plugin> <groupId>org.apache.maven.plugins</groupId> <artifactId>maven-dependency-plugin</artifactId> <version>3.2.0</version> <!-- 使用适合你的版本 --> <executions> <execution> <id>copy-dependencies</id> <phase>prepare-package</phase> <goals> <goal>copy-dependencies</goal> </goals> <configuration> <outputDirectory>${project.build.directory}/lib</outputDirectory> <overWriteReleases>false</overWriteReleases> <overWriteSnapshots>false</overWriteSnapshots> <overWriteIfNewer>true</overWriteIfNewer> </configuration> </execution> </executions> </plugin> </plugins> </build> |
执行maven打包命令,打包完后,将得到这样的结果:
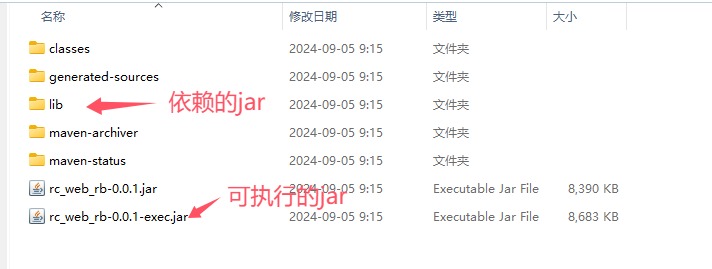
3.复制resource文件夹
直接复制项目里的src\main\resources文件夹到准备发布目录即可。
4.上传更新文件
将上面的lib目录和***-exec.jar和网站项目下src\main\resources目录复制到一起,大概像这样:

将上面目录上传到服务器,然后执行命令:
java -Dloader.path=./lib,./resource -jar rc_web_rb-0.0.1-exec.jar
即可运行Springboot项目。
四、增量发布的好处
进行增量打包后:
1.如果前端有修改时,可以对resource中的文件进行替换,且不用重启服务。
2.如果后端有修改,要看是web项目修改还是引用的jar修改:
(1)如果是web项目有修改,只用更新项目****-exec.jar即可(需重新执行启动命令)。
(2)如果是引用的jar包有修改,只需将变动的jar包上传至lib文件夹即可。
附:Springboot启动脚本
|
1 2 3 4 5 6 7 8 9 10 11 12 13 14 15 16 17 |
#!/bin/sh #路径 APP_LIB=/***/lib APP_RESOURCE=/***/resources APP_NAME=/***/rc_web_rb-0.0.1-exec.jar APP_LOG=/***/rc_web_rb-0.0.1.log
# 查询是否有原进程 tpid1=`ps -ef|grep $APP_NAME|grep -v grep|grep -v kill|awk '{print $2}'` # 如果此进程已经启动,则先杀掉 if [ $tpid1 ]; then kill -9 $tpid1 fi
# 启动项目jar包,java命令写成了绝对路径,因为系统启动的时候是不识别环境变量的 # 日志文件也写成了绝对路径,不然日志会输出在init.d目录 nohup /usr/lib/jvm/jdk-17.0.2/bin/java -Dloader.path=$APP_LIB,$APP_RESOURCE -Dspring.profiles.active=pro -jar $APP_NAME -> $APP_LOG 2>&1 & |
修改对应参数,将脚本保存为start.sh,切换到脚本所在目录,执行:./start.sh 即可启动项目。